
Your home should tell your story. DIY home decor projects give you the freedom to create pieces that reflect your style, your memories, and your creativity. Whether you love a rustic charm, a modern vibe, or a mix of both, crafting your own items adds a layer of uniqueness no store-bought product can match.
For DIY enthusiasts, every object is an opportunity to transform a plain space into something magical. From upcycling old jars to creating stunning wall art, your hands hold the power to make your home feel truly yours. All you need is a little time, some basic materials, and a spark of imagination.
Ready to dive into a world where your creativity sets the tone? Let’s explore inspiring DIY projects step by step and see how you can give every corner of your home a personal touch that’s as unique as you are.
What is DIY Home Decor?
DIY (Do It Yourself) home decor is all about creating personalized pieces for your living space using your own skills, creativity, and often, everyday materials. It’s not just a hobby—it’s a way to make your house a reflection of your personality. From painted vases to handcrafted shelves, these projects allow you to design unique accents that can’t be found in stores.
The beauty of DIY lies in its flexibility. You don’t need to be a professional artist or have a massive budget. With a few basic tools and a little inspiration, you can craft stunning decor that aligns perfectly with your taste and brings warmth to every corner of your home.
Essential Tools and Materials
Before starting your DIY journey, it’s essential to gather some basic tools and materials. Having these on hand will make each project smoother and more enjoyable:
- Scissors and craft knives
- Glue gun and glue sticks
- Paints (acrylic or spray) and brushes
- Sandpaper and wood stain
- Measuring tape and level
- Recyclable materials (jars, cans, pallets, fabric scraps)
These staples are the backbone of countless DIY projects. As you progress, you might expand your toolkit, but these essentials will get you off to a great start.
10 DIY Projects to Add Personality
Here’s where your creativity takes center stage. These ten step-by-step DIY projects are designed to add character and style to your home—whether you’re decorating a cozy apartment or a larger house.
1. Painted Mason Jar Vases
Mason jars are versatile and perfect for creating charming vases.
Steps:
- Clean and dry the mason jars thoroughly.
- Apply a coat of primer to help the paint adhere.
- Paint the jars in your chosen colors using acrylic paint.
- For a rustic look, lightly sand the edges once dry.
- Add fresh flowers or dried arrangements for a cozy touch.
Pro Tip: Tie a burlap ribbon around the neck for extra flair.
2. Floating Wooden Shelves
Functional and stylish, floating shelves are perfect for displaying decor.
Steps:
- Cut wooden planks to your desired size.
- Sand the surface and edges until smooth.
- Stain or paint the wood for your preferred finish.
- Install L-brackets on the wall using a level for alignment.
- Place and secure the planks on the brackets.
Pro Tip: Style the shelves with plants, books, and framed photos.
3. Upcycled Tin Can Lanterns
Create ambient lighting with these charming lanterns.
Steps:
- Clean empty tin cans and fill them with water. Freeze overnight.
- Draw a simple design (stars, hearts) on paper and tape it to the can.
- Use a hammer and nail to punch holes along the design.
- Let the ice melt, dry the cans, and spray-paint them.
- Place tea lights inside for a magical glow.
Pro Tip: Use battery-powered candles for safety.
4. Fabric Wall Art Panels
An easy way to add color and texture to blank walls.
Steps:
- Choose fabric patterns that complement your room.
- Stretch the fabric over a canvas frame or wooden frame.
- Staple the fabric tightly at the back.
- Hang them in a set for maximum visual impact.
Pro Tip: Mix bold and neutral patterns for a balanced look.
5. Decorative Ladder Rack
Great for hanging blankets, towels, or even plants.
Steps:
- Cut wooden dowels and side rails to size.
- Assemble the ladder using wood glue and screws.
- Sand and stain for a polished appearance.
- Lean the ladder against a wall and style it.
Pro Tip: Add S-hooks for hanging baskets or planters.
6. Pallet Coffee Table
Rustic and sustainable, this is a standout DIY furniture piece.
Steps:
- Find two sturdy wooden pallets and sand them down.
- Stack them, securing with screws.
- Attach casters to the bottom for mobility.
- Finish with a glass top or stain for extra style.
Pro Tip: Add a lower shelf for books or decor items.
7. Rope-Wrapped Planters
Bring natural textures into your home with this simple idea.
Steps:
- Use a hot glue gun to attach rope around a plain planter.
- Wrap tightly until the entire pot is covered.
- Trim and secure the end with extra glue.
Pro Tip: Combine different rope thicknesses for added interest.
8. Photo Collage Wall
Turn memories into a decorative focal point.
Steps:
- Print your favorite photos in various sizes.
- Arrange them on the floor to plan your layout.
- Use adhesive strips or washi tape to mount them.
- Add string lights for a cozy effect.
Pro Tip: Mix photos with inspirational quotes or art prints.
9. DIY Terrariums
Bring a bit of greenery indoors with low-maintenance terrariums.
Steps:
- Choose a glass container (open or closed).
- Add layers: small stones, activated charcoal, potting soil.
- Plant succulents or moss and decorate with pebbles.
Pro Tip: Avoid overwatering—succulents need minimal moisture.
10. Painted Accent Wall
Make a bold statement with just paint and creativity.
Steps:
- Select a wall and clean its surface.
- Tape off sections for geometric designs or patterns.
- Apply paint carefully, letting each color dry between layers.
- Remove tape for crisp lines.
Pro Tip: Try stencils for intricate patterns.
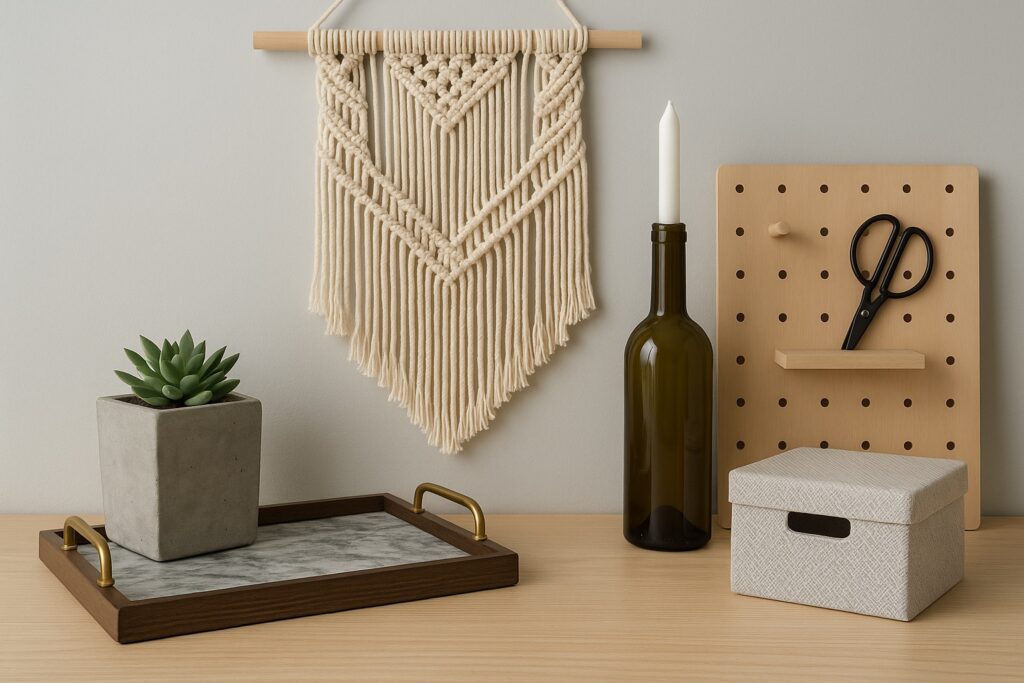
11. DIY Macrame Wall Hanging
Macrame wall hangings are an easy way to add texture and boho charm to your home.
Steps:
- Start with a wooden dowel or branch as your base.
- Cut several strands of macrame cord to equal lengths.
- Attach the cords using a lark’s head knot.
- Begin tying square knots or alternating half-hitch knots to create patterns.
- Trim the bottom of the cords into a V-shape or straight line for a polished look.
Pro Tip: Choose cords in natural tones for a minimalist vibe or bright colors for a playful touch. Hang above a sofa or bed for instant character.
12. DIY Concrete Planters
Concrete planters bring an industrial, modern feel to any space while being surprisingly simple to make.
Steps:
- Mix concrete according to package instructions.
- Pour it into a mold—plastic containers work great for this.
- Place a smaller container inside to create the planter’s cavity.
- Let it cure for 24-48 hours before removing from the mold.
- Sand any rough edges and paint or seal for added durability.
Pro Tip: Use molds of different shapes to create a set of varying sizes, perfect for succulents or herbs.
13. DIY Decorative Tray
A chic tray can organize clutter and serve as a beautiful centerpiece.
Steps:
- Use a wooden board or an old picture frame as your base.
- Sand and paint or stain the surface to match your decor.
- Attach handles on either side using screws or strong adhesive.
- Seal the surface with varnish to protect against moisture.
Pro Tip: Line the bottom with decorative paper or fabric and cover it with a glass sheet for a custom touch.
14. DIY Wine Bottle Candlesticks
Turn empty wine bottles into elegant candlesticks for your dining or living room.
Steps:
- Remove labels by soaking bottles in warm, soapy water.
- Spray-paint the bottles in metallic or matte colors.
- Place taper candles in the bottle necks and secure with melted wax.
- Arrange as a centerpiece or on a mantel for dramatic effect.
Pro Tip: Vary bottle heights and colors for a more dynamic display.
15. DIY Pegboard Organizer
Keep your workspace or entryway stylishly organized with a pegboard.
Steps:
- Cut a wooden board to your desired size and drill evenly spaced holes.
- Paint or stain the board for a finished look.
- Insert wooden pegs and add small shelves or hooks.
- Mount the pegboard on the wall using anchors.
Pro Tip: Customize with baskets, clips, and hanging jars for maximum functionality.
16. DIY Fabric-Covered Storage Boxes
Give plain storage boxes a facelift with fabric for an elegant and coordinated look.
Steps:
- Wrap fabric around a cardboard or wooden box, securing with hot glue.
- Fold neatly at the corners for a professional finish.
- Add decorative labels or handles for easy access.
- Use these boxes to organize shelves or closets stylishly.
Pro Tip: Mix patterns within a color palette for a designer-inspired aesthetic.
Safety Tips for DIY Projects
- Always work in a well-ventilated area when using paint or glue.
- Wear protective gear (gloves, goggles) for cutting or sanding.
- Keep tools out of reach of children and pets.
- Follow instructions for power tools carefully.
How to Make Your DIY Decor Last
To ensure your hard work stands the test of time:
- Use quality materials from the start.
- Apply sealants to protect wood and painted surfaces.
- Clean your handmade items gently and regularly.
- Store seasonal decor in dry, safe places.
With a little care, your DIY creations can become treasured elements of your home for years.
Conclusion
DIY home decor isn’t just about saving money—it’s about crafting a space that feels like you. Each handmade piece carries a story, a memory, and a spark of your creativity. Whether you’re crafting for fun or transforming your entire home, the journey is as rewarding as the result.
Start with one project, embrace the imperfections, and watch your home come alive with personality.
FAQ
1. What are the easiest DIY projects for beginners?
Mason jar vases, rope-wrapped planters, and fabric wall panels are perfect starting points.
2. How much does it cost to start DIY home decor?
You can begin with as little as $20 if you use recycled materials and basic tools.
3. Can I do these projects in a rental home?
Yes! Focus on removable or non-damaging decor like wall art and portable shelves.
4. How long do DIY projects usually take?
Simple projects can take 30 minutes to 2 hours, while larger ones might need a weekend.
5. Where can I find more inspiration for DIY home decor?
Check out Pinterest, Etsy, and YouTube DIY channels for endless ideas.
Writing is my passion. I have been writing stories since I was a little kid, and I am grateful that I can continue to write and help people through my content. With a degree in Marketing, I truly love studying, especially when I can enjoy a good cup of coffee at the same time.